Friday 18 October 2013

Water Bottle Fish

And now for a hanging, swimming fish made out of an old plastic bottle.  A few of them all hung up together would look beautiful!


You will need:
  • A water bottle
  • Thin card
  • Cellotape
  • Tissue paper in 2 or 3 different colours torn into strips.
  • PVA Glue
  • Paint brush
  • Glitter
  • Glittery fabric pen
  • Sequins
  • Felt pens
  • Needle and thread
First of all, take the lid off your bottle and cut out some fin shapes and a tail shape for your fish.  Stick the shapes to your bottle with cellotape.  


After taking the bottle lid off, paint the fish with PVA glue and cover with the different colours of tissue paper, painting on more PVA glue as you go.  Leave to dry.


This is the fun bit! Go crazy with glitter pens, felt pens, sequins and glitter to give your fish markings and scales.  Leave to dry.


Scrunch up a length of tissue paper and two tissue paper balls.  Dip the 'eyes' into the PVA and stick into position on the fish.  Dip the strip of tissue paper into the PVA glue and while twisting, glue around the bottle opening for its mouth.  Leave to dry.  


Draw some eyes onto some thin card using felt pen.  Cut them out and stick them onto the fish.


Thread some cotton through the top of the fin and tie a knot.  And there you go - you're ready to hang it up and let it swim around!


Wednesday 9 October 2013

Toilet Roll Animals

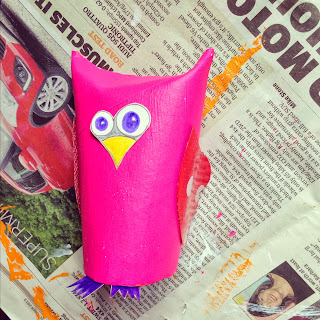
I've made (another) owl and an octopus out of toilet rolls.  They're rather cute and very easy to make.


Here's what you need for the owl:
  • Toilet Roll
  • Gesso or white acrylic for undercoat (or paint 2 coats of poster paint for good coverage)
  • Double sided sticky tape
  • Paint brush
  • Poster paint
  • Felt pens
  • Old wrapping paper/wall paper/origami paper/anything with a pattern
First of all undercoat the toilet roll in white acrylic paint or gesso.  This isn't essential, it just makes the colour you paint on next cleaner and brighter looking.


Next paint the tube in your preferred owlie colour.  Leave to dry.


Fold the top of the tube over as shown to give your owl her ears.


Draw eyes, a beak and some claws onto a piece of white paper and colour in.  Cut some wings out of fabric or patterned paper.


 Stick'em all on and there you have it!


Friday 4 October 2013

Carboard Box Robot


Do you fancy making a lovely little Robot?  Here's what you need:
  • Cardboard boxes for body and head
  • Plastic packaging for control panel
  • Cardboard tubes for arms and legs
  • Milk bottle top for neck
  • Tin foil
  • 2 x Polystyrene balls 
  • Gesso or white acrylic paint (optional)
  • Poster paint
  • Glitter
  • Sequins
  • Cardboard 
  • PVA Glue or double sided tape
  • Scissors
  • Paint brush
First of all stick the boxes and tubes together to get your Robot shape.


Then undercoat the robot with white acrylic or gesso (this is just to cover up any writing on the boxes.  You could just give it a couple of coats of poster paint instead). 


To make the doolie boppers twist some tin foil into two 'stalks', poke a hole into each polystyrene ball, coat the tip of the 'stalk' in PVA glue, stick into the hole and wait to dry.


Make two small holes with the end of your scissors in the top of the 'head' box and push the doollie boppers in.  If possible bend the ends at right angles inside the 'head' box and fasten with cello-tape.   


Cover the whole robot in silver paint and wait to dry.


And then decorate to your heart's delight!  Go wild with sequins, glitter, tin foil, buttons, springs, nuts and bolts - anything you fancy to bring your Robot to life.