Thursday 28 November 2013

Paper Plate Masks

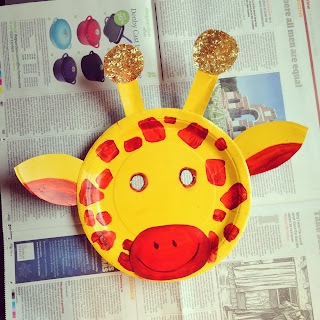
These are ever so easy to make and the possibilities are endless!  Here's my friendly little giraffe.


What you need:
  • A paper plate
  • Paint and paint brush
  • Scissors
  • Thin coloured card
  • Double sided tape
  • Elastic
Paint your plate whatever colour your animal will be.


When dry add any markings the animal might have.


Cut out the eye holes and draw ears, nose, mane, trunk etc on separate pieces of card.  Cut out and colour/decorate and stick to the paper plate with double sided tape.


Make a hole at either side of the face, attach some elastic and that's that!


Tuesday 26 November 2013

Balloon Animals

Almost any animal could be made using this method.  I've made a penguin because I'm feeling christmassy, but it could be a nice project to do near Easter making rabbits and chicks too.


You will need:
  • A balloon, only half inflated.
  • Newspaper
  • PVA glue
  • Strips of newspaper
  • A brush
  • White kitchen towel or toilet paper
  • Rice or sand
  • Paint
  • Felts and coloured card
  • Double sided tape
  • Scissors
  • Goggly eyes
Cover the balloon with strips of newspaper dipped in a 50/50 water/glue solution.  Once you have put 3 or 4 layers of newspaper on, finish with a couple of layers of white kitchen towel dipped in the glue solution.  This way it will be ready to paint when dry.


Once dry burst the balloon and pull it out. Poor enough rice or sand into the hole to weigh the balloon down and stand up securely.


 Seal the hole up with more newspaper and kitchen towel dipped into the glue solution.


Leave to dry again and then paint the balloon with your animal colours.


And lastly, when dry decorate with coloured cardboard and goggly eyes!


Sunday 10 November 2013

Little Monster Felt Hand Puppet

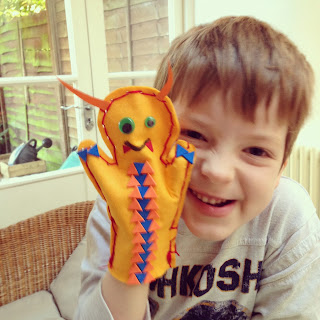
My very lovely assistant helped me with this one.  I was planning to make a chick or a rabbit but as you can see, it turned into a very cute baby monster instead!


You will need:

  • Felt
  • Scissors
  • A plastic sewing needle
  • Coloured embroidery thread 
  • A fabric hole punch
  • Googly eyes
  • Any coloured card or fabric that you would like to cut out and stick on to decorate your creature, whatever it turns out to be!
First of all, cut two hand puppet shapes out of some felt.


Sew a big cross on them to keep them aligned - this will just make it easier for your child to sew them without the fabric slipping about.


Using a fabric hole puncher, punch holes all the way around the outside of the hand puppet, about 0.5cm from the edge.


At the first hole tie a knot to stop the thread from slipping.  Sew all the way round (and back if you want there to be a solid line of coloured thread).  Sew in and out of the last 2 holes a few times to stop the thread from unravelling.


And last of all, decorate!  


Wednesday 6 November 2013

Hobby Horse Cereal Box Dragon

This is a lovely Cereal Box Dragon that I saw on a different blog (http://mylittle3andme.co.uk/dragon-hobby-horse/) and thought would be fun to make.  In fact, different animals could easily be made from the basic cardboard box shape so my son and I plan to have a go at making a unicorn over the weekend!

Here's what you need:
  • A big cereal box (the kind you get Shreddies or Cheerios etc. in)
  • A paint brush
  • Gesso or white acrylic paint (optional)
  • Poster paint
  • Tissue paper and PVA glue (optional)
  • Some yellow, orange and red paper 
  • Felt pens
  • White card
  • A long cardboard tube (like the ones you find inside rolls of wrapping paper)
  • A green recycling bag
  • Cellotape
  • Double sided sticky tape
Paint your box with gesso or white acrylic.  This isn't essential but it means the text from the cereal box won't show through the poster paint at all.


Next draw the dragon's snout on the front and the lines shown below on both sides of the box.  


Cut along these lines so that your box now looks like this.


Fold down the two flaps inwards (they might need a trim) and tape them into place.  Next stick down the loose side of the box to the top of the snout and tape over the edges for extra strength.


Paint the dragon your most dragony colour (I also covered mine with torn green tissue paper and PVA glue for a scaly texture, but this is not at all necessary, just paint would look great) and cut jagged shapes into the cardboard behind the head.


Draw nostrils, eyes and a pair of horns onto white card.  Cut them out and stick them into place.  Make a fiery tongue and stick it into a little slit you cut into the front of the snout.  Secure from the inside with tape.


Cut a hole in the base of your dragon.  Stick your cardboard tube up and secure with cellotape.


Cut the sealed bottom off a green recycling bag and stick to the inside of the dragon's head with double sided tape.  Cut jagged shapes into the bottom of the bag and there you have it - one dragon ready to be conquered by your knight!